Want to schedule a quick Gantter demo?Click here.
Frequently Asked Questions
Free Trial & Subscriptions
No. You don't need a credit card for a free trial account. You need to enter your credit card information only when you want to move to a paid subscription.
After your trial has expired, you will still have access to view your Gantter files or Open and View MS Project files. However, without a paid subscription (post free trial), you will be unable to edit existing projects or create new projects.
a Monthly Payment: Online via credit card
bAnnual payment: Online
cAnnual for more than 20 users: Purchase order / Invoice / Wire transfer / Check
Yes, when purchasing a subscription (monthly or annually) it is auto renewed at the end of the period.
aBuy and cancel licence
bAssign (and re-assign) users to licence
cDownload all of your past and current invoices
Yes, 30% for qualified NPOs and 50% for EDUs. Contact us at sales@gantter.com to request your discount.
Anyone that has used a Gantter trial will have rights to view your project, but they will not have editing rights. You can also share a PDF of your project.
1. Click on "Manage Subscription". This can be found in the menu on the top-left of the home screen or under the "help" menu in the editor.
2. Click on "Buy & Manage Subscriptions"
3. Click on "Buy More"
The following are the steps to assign users to the licenses:
1.Click on "Manage Subscription". This can be found in the menu on the top-left of the home screen or under the "help" menu in the editor.
2.Click on "Manage User"
3. Enter the email address of the user you would like to add and click the '+' button
4.Then click "Apply Changes"
Remember: You will need to open the link to the edition you originally purchased from. The following are the links to the Manage Subscription pages:
Gantter for Google Drive Gantter for G Suite or Google Drive Gantter Cloud
1. Click on "Manage Subscription". This can be found in the menu on the top-left of the home screen or under the "help" menu in the editor.
2. Click on "Manage User"
3. Enter the email address of the user you would like to add and click the '+' button
4. Then click "Apply Changes"
Getting Started
There are numerous community-contributed project templates for you to choose from. Our community of users are constantly contributing project plan templates that any user can use for FREE. Simply search for the topic you are looking for and select a template that best matches your project needs.
Anyone you share a file with can view the file without purchasing a Gantter subscription. Only users who need to create or edit Gantter files should pay for subscription licenses.
Yes. This is true for all editions of Gantter (Google Drive, GSuite and Cloud). Real-time editing will allow you and multiple collaborators to edit the same file at the same time.
Yes. When you’re in Gantter, go to the project menu and click sync to google task check box. Then go to your Google Calendar and enable the task view option from the My calendar menu.
You can change this from the Project Properties options. F8 will open your Project Property tool or select Properties from the File menu.
Yes, if you double-click on a task to open the Task Properties, you can then go to the Links tab to link to another file such as a PDF or a Doc.
Yes, custom user and team training sessions can be set up with our support team. Please send us an email to set up a time for a training webinar to info@gantter.com. Or you can schedule one yourself if you click here.
Onboarding & Gantter Editions
For Google Drive: Simply search for Gantter in the Google Drive Connect App interface. You can find it as follows:
> Google Drive +NEW menu
> More
> + Connect more apps
> Type “Gantter”
For G Suite: Simply go to the G Suite Marketplace and search for “Gantter”.
The biggest difference between Gantter for Google Drive or G Suite and Gantter Cloud is where the files are stored. For Google editions, the files are stored in your Google Drive or Team Drive, where as with Gantter Cloud, the files are stored in our Google powered secure Gantter Cloud File Store.
Yes, with the purchase of any Gantter subscription, you will be able to log in with that email address in either the Gantter Cloud, Google Drive, and/or G Suite editions.
You can transfer files by exporting them using the "Export to local Gantter file" option in the "Project" menu of the Gantter editor. Once in your desired edition, you can import using "Import local Gantter file" from your "Project" menu of the Gantter editor.
Please use the following steps to update your info:
1.Go to "Manage Subscription" from your account.
2.Click on "Buy & Manage Subscriptions"
3.Click on "Change" next to your billing details
4.Type in your billing details
5.Click “Update”
1. Click on "Manage Subscription". This can be found in the menu on the top-left of the home screen or under the "help" menu in the editor.
2. Click on "Manage User"
3. Enter the email address of the user you would like to add and click the '+' button
4. Then click "Apply Changes"
Common Doubts & Issues
Yes. You can submit a help ticket by emailing info@gantter.com
The files saved in Gantter for Google Drive and Gantter Cloud are separate. If you log into one edition, you will not see the files you have saved in the other edition.
Gantter for Google relies on Google’s Share API that is sometimes not available from Google. However you can also share your projects directly from Google Drive: My Drive. You can also try clearing your browser's cache or use Chrome's incognito mode (press Ctrl + Shift + N to bring up a new incognito window) and then try again from the Gantter editor.
When choosing the print options in Gantter, you can choose to generate PDFs for the "Task List" and the "Gantt Chart" separately or together. This helps it fit better on one page when printing.
Gantter generates the PDF as a single-page. The steps to break it up into multiple pages so the print is larger depends on your PDF software and your printer. This link can give you instructions to print as multiple pages using Adobe Reader.
You can also try choosing the "HTML" print option from Gantter instead of PDF. You can then print it the way you would print any web-page.
To change your language, please go to account settings on the top right corner of your Gantter page and click on your email. You will find a language change drop down menu inside ‘Manage account info’. You can change your language settings there.
You can create a resource in the right side toolbar, under the “Resources” tab, or by double-clicking on the task to open Task Properties. Once you are under “Resource”, you can name the resource and pick a resource type. A type of resource could be a “Worker” or “Material”.
Once you have created the resource, you can then assign it to the task.
If the Resource is a material such as a “paint bucket”, you can change the units needed to complete the task from one to more units.
Yes, you can view a list of tasks that resources are assigned to. This view will also give you the hours worked by the resource. In the Resource tab on the right side toolbar, you will see a list of your resources. Click the “Switch to Resource Usage View” on the top toolbar. Then a list of tasks will appear for each resource on the left side of the screen, and on the right side you will see a breakdown of the weekly hours worked.
There are three features you can use for this:
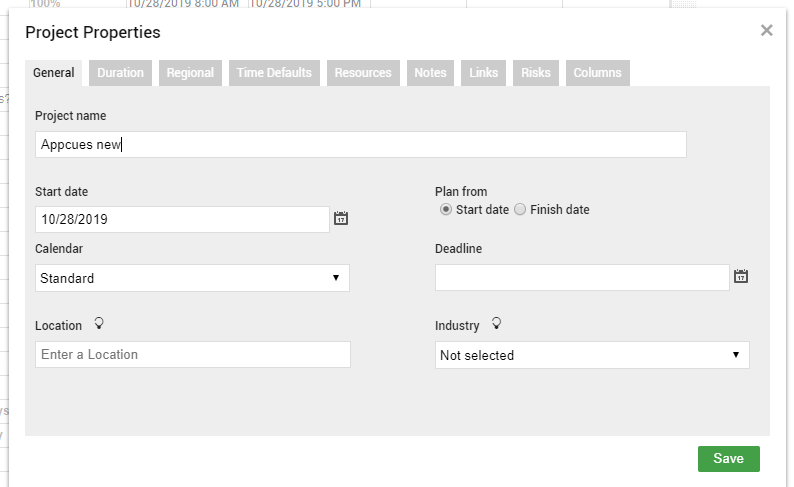
1.From the General settings in Project Properties
Open Project Properties, and under the “General” tab, change the “Plan from” from Start date to Finish date.
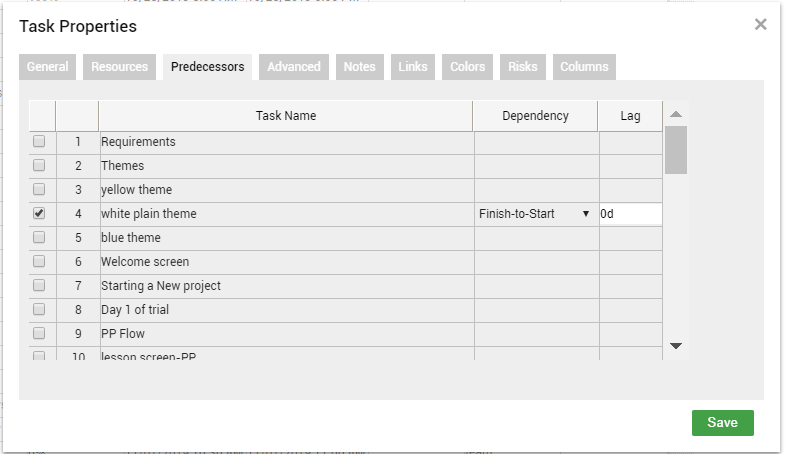
2.Changing the Dependency in the Predecessors menu to “Finish-to-start”
Open Task Properties by double clicking on the task that is being worked on. Select Predecessors, which is the third tab under Task Properties). From there, click on the task that you will want to finish before starting the task you are working on.
Remember to think of this as a sentence: (task that is checked off) needs to finish to start (task that is highlighted)
3.Changing your Constraint in the Advanced menu to “As late as Possible”
While under Task Properties of the highlighted task, click on the “Advanced” tab to view constraints used on the task in question. You will then need to change the constraint to “As late as Possible”

Yes. In Project > Properties > Regional you can change the format of First day of the week, as well as the Date format.
Gantter does not save projects as .mpp files, but you can export to a Microsoft Project XML file that can be opened using Microsoft Project.
Please use the "Export to MS Project (download)..." option in the "Project” menu of the Gantter editor to download the XML file.
If the issue is that you can't find the XML file from the Microsoft Project file picker, please make sure to select "XML Format (.xml)" or "All Files (.*)" from the file type drop-down. By default this shows "Projects (*.mpp)".
Please see the following link for additional instructions on opening the XML file in Project: https://docs.microsoft.com/en-us/office-project/xml-data-interchange/saving-and-opening-projects-in-xml-format?view=project-client-2016
You can select multiples projects inside your Gantter homepage. Hold down the CTRL key as you select them. On the bottom right corner you will see a circle appear for visualization. This function will show built-in analytics and reports for all your projects.
If you do not see a cost column, please go to your top toolbar and under the “View” dropdown menu you will be able to view cost column.
To view and unview a column please go to your top toolbar and under the “View” dropdown menu you will be able to view the list of grid columns to click on or off.
There are two different ways to zoom in Gantter. The first way is Gantter's zoom functionality which is using the "Zoom In" or "Zoom Out" buttons on the toolbar or in the View menu of the Gantter editor. This changes the time periods of your gantt chart and allows it to go from a monthly view to a weekly view.
However, if you want to zoom in on the entire project as a whole, you can use your browser's zoom functionality. [If you use Chrome, please see the following link for how to zoom in Google Chrome: https://support.google.com/chrome/answer/96810?hl=en ]
This could be caused by a loop in your predecessors. Please look over your predecessors to make sure you do not have a parent task being performed after a sub-task. If this issue still occurs please send a shared copy of your file to our support team at support@gantter.com.